Ah, the Smith Machine — the piece of gym equipment that elicits a lot of strong feelings, ranging from love to … not love. But despite the debate that surrounds it, some great benefits can come from knowing how to use a Smith machine correctly.
The Smith machine may have its critics, but with these expert tips on proper use, you can learn how to use it for real gains.
What is a Smith machine?
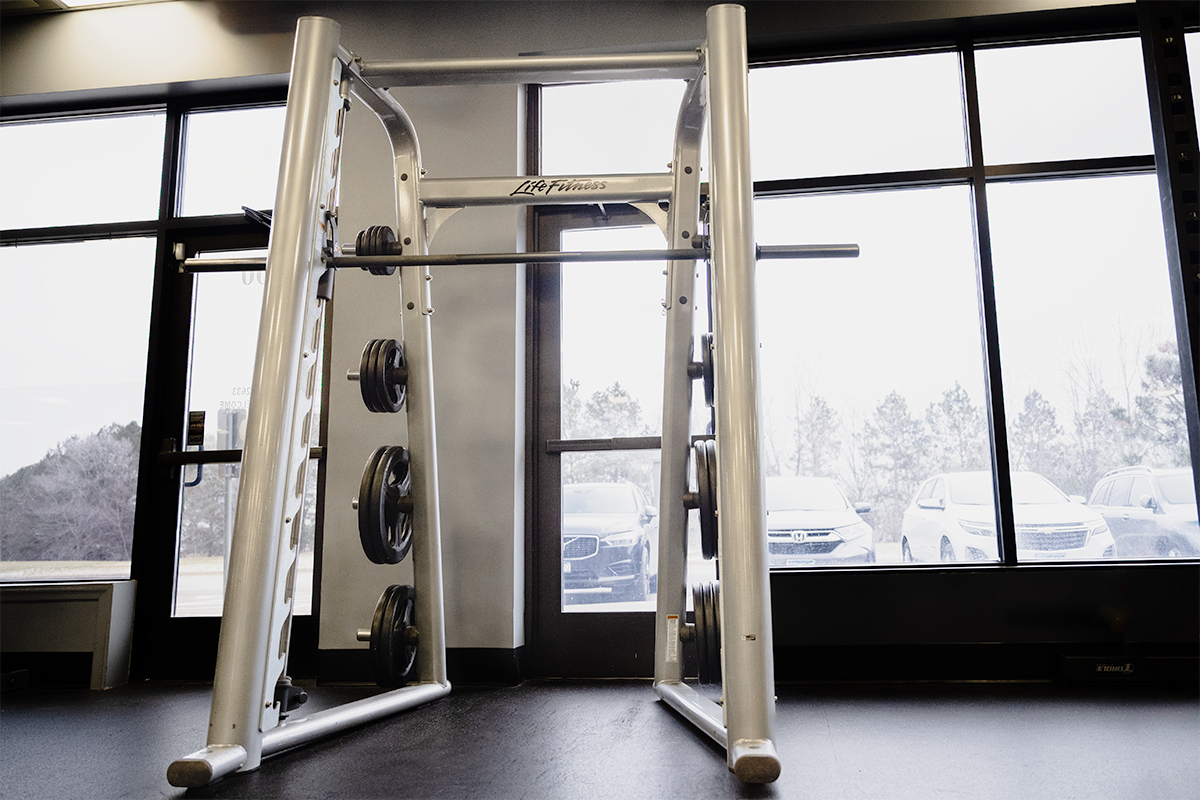
A Smith machine is a piece of gym equipment with a barbell that slides up and down two steel rails. The standard Smith machine is designed for controlled barbell strength-training exercises and allows for vertical movements only. (There are some newer models that allow for a small amount of horizontal movement as well.)
Types of Smith machines
There are several types of Smith machines, with the two most common being the standard vertical machine and the angled version (pictured above).
Standard Vertical Smith Machine
The traditional Smith machine allows for straight up-and-down movements only. It’s a good option for those who want to do variations of basic weightlifting exercises, such as hack squats and single-leg deadlifts.
Angled Smith Machine
An angled Smith machine is very similar to the standard vertical machine, except that instead of moving up and down, the barbell’s path is slightly slanted, which better mimics the natural movements of the body during lifting.
How much does a Smith machine barbell weigh?
The weight of the bar itself varies based on the manufacturer but usually is between 20 and 45 pounds. Since the bar is attached to the machine and glides up and down the side bars while in motion, the amount of friction can affect how heavy the bar feels. If the machine has recently been maintained/oiled, the bar may feel like it moves more easily, and may feel lighter. And of course, you can add and remove weight plates as you go.
Muscles worked while training on a Smith machine
The muscles worked depends on the exercises you’re performing. However, in general, Smith machines direct the force of the load toward the prime mover and away from the stabilizer muscles involved in the motion.
As an example, the Smith machine bench press will place most of the force on the pectoralis major. If you were to use dumbbells instead of the Smith machine, the shoulders and lats would also be involved in balancing and stabilizing the motion.
Do Smith machines make weight-training exercises easier?
For some people, certain exercises may feel easier on the Smith machine because it holds the barbell for you, which means you don’t need to stabilize the weight as much as you would when using free weights. Balance is also easier. The only action you have to focus on is the push or pull and keeping a braced core.
If your goal is to improve your balance and stability, try free weights instead of the Smith machine. The same goes for building strength if you’re at an advanced fitness level. But if you’re learning new weightlifting exercises and feel intimidated by barbells, the Smith machine can be a great option to build confidence.
Benefits of using a Smith machine
When you know how to use a Smith machine properly, it can have many advantages. The way we see it, the biggest benefit is gaining confidence with new exercises. It can serve as a nice stepping stone from dumbbells to barbells.
For example, when learning how to bench press, start with lighter dumbbells to develop strength and stability and get used to the range of motion. Then, try a Smith machine bench press before ultimately graduating to the barbell bench press.
Other potential benefits include:
- Greater control while lifting: The fixed barbell path can help reduce the risk of injuries and give you more stability during heavy lifting.
- Good for working out alone: The adjustable safety stoppers on each side ensure that the barbell can never fall on you, making it a good choice for those training solo.
- Helps with posture and form: The fixed bar path can help with your posture and let you concentrate on correct form. Plus, unlike other free-standing barbell machines, the Smith machine’s ability to add small increments to your lifts allows you to make gains gradually. This not only makes training more comfortable, but it also leaves room for you to focus on perfecting your form and technique.
- Easier on the joints: The Smith machine is often more comfortable on your joints than other lifting machines since it reduces the overall strain on your body. Each lift is more controlled, which limits the potential for injury-related pain and discomfort. So, if you’re someone who experiences joint pain, especially around the shoulders or knees, incorporating the Smith machine into your routine may lessen the chances of injuring those areas.
- Works for all fitness levels: While the Smith machine is often used by beginners, it can be incorporated in more advanced workouts as well — especially if you’re feeling bored and in need of a shake-up with your usual strength routine.
- Targets multiple muscle groups: The Smith machine is versatile, meaning you can perform a number of different exercises for a full-body workout.
Disadvantages of using a Smith machine
Even if you know how to use a Smith machine correctly, there are potential downsides to consider:
- Fixed path: While the fixed barbell path can be an advantage, there are also times when it can be a disadvantage — especially with certain exercises.
- Lower effectiveness: While Smith machines may make exercises feel easier to complete, they may also be less effective. Without the range of motion you get from free-weight exercises, your muscles aren’t activated in the same way — or as much — as they otherwise might be.
- Potentially less growth in stability overtime: Because balance isn’t as much of a focus when using a Smith machine as compared to free weights, you’re actually losing out on the opportunity to build stability in your core when you have the machine do the work for you.
Using a Smith machine safely
As with any exercise or gym equipment, correct use and form are vital to avoiding injury and getting the most out of every movement. Here are some important safety tips to keep in mind:
- Set the pins before you lift. These pins keep the bar from coming down on you during an exercise.
- Position the barbell at the right height. At its highest, it should be level with shoulders so you can lift it without needing to come up on your tiptoes.
- Don’t slack on form. While Smith machines can give an increased sense of safety and stability, it’s still important to brace your body and perform every rep under control to avoid injury.
- Ask questions if you aren’t sure: Check with a trainer if you’re not familiar with the Smith machine.
- Listen to your body: If you feel pain or discomfort, stop the exercise and make adjustments.
Facing the right direction while training on a Smith machine
A large part of knowing how to use a Smith machine properly is knowing which way to face during a workout.
With the standard vertical Smith machine, the direction you face doesn’t matter since you’ll be going straight up and down during your range of motion.
When using the angled Smith machine, the way your body faces depends on the exercise you’re doing. For example, when you’re a variation of a squat (i.e., a sumo squat), you’ll want to face away from the machine so that the barbell travels down and toward you — rather than away from you — as you squat.
If you’re not sure which direction to face for any given exercise, ask a trainer or gym staff member.
Exercises to avoid doing on the Smith machine
Just because an exercise can be done on a Smith machine, doesn’t mean that it should be — even if you know how to use a Smith machine correctly.
A lot of the time, there are drawbacks to the Smith machine that can outweigh the benefits. That’s why we consider free weights to be the gold standard for building a strong and stable physique. Here are a few exercises we discourage doing on the Smith machine.
Squats
The Smith machine is not the ideal environment for squats. Because the barbell is attached to the machine, your body is forced to adjust to a certain position while squatting. If not performed correctly, the Smith machine squat could actually lead to excess wear on the joints and potential injury.
If you have your heart set on squats in the Smith machine, you can avoid placing excess stress on the knees and hips by taking a generous step forward and standing at an angle, with your back against the bar, before you begin squatting. As you lower down in your squat, your body will be moving downward at an angle toward your feet as opposed to vertically.
Deadlifts
A barbell is preferable to the Smith machine when it comes to deadlifts, especially if you’re less confident in your form with this exercise. When lifting a barbell, the weight and the bar can follow your body’s lead through the ideal range of motion. Because the Smith machine has a fixed bar path, your body needs to follow the bar’s motion path, which may increase the risk of a lower back injury.
If you do want to use the Smith machine for deadlifts, opt for the standard vertical version. This is safer than an angled Smith machine because the ideal barbell pattern during the deadlift is vertical.
Shoulder exercises
Because the body doesn’t have much freedom to move through the proper range of motion for many shoulder exercises, the Smith machine can put strain on the shoulder joint. For that reason, avoid doing upright rows or bilateral shoulder presses on a Smith machine.
Single-arm shoulder presses could work, as long as you’re facing to the side. We don’t recommend facing the bar and using both arms, however.
4 exercises to try on the Smith machine
There are unique and novel ways to use the Smith machine and take advantage of its features. NOTE: These Smith machine exercises are for the angled Smith machine. The number of reps you do is up to you, but 6–12 is a good place to start.
1. Wide-Leg Sumo Squat
Muscles worked: Glutes, quads, calves, hamstrings, and adductor muscles
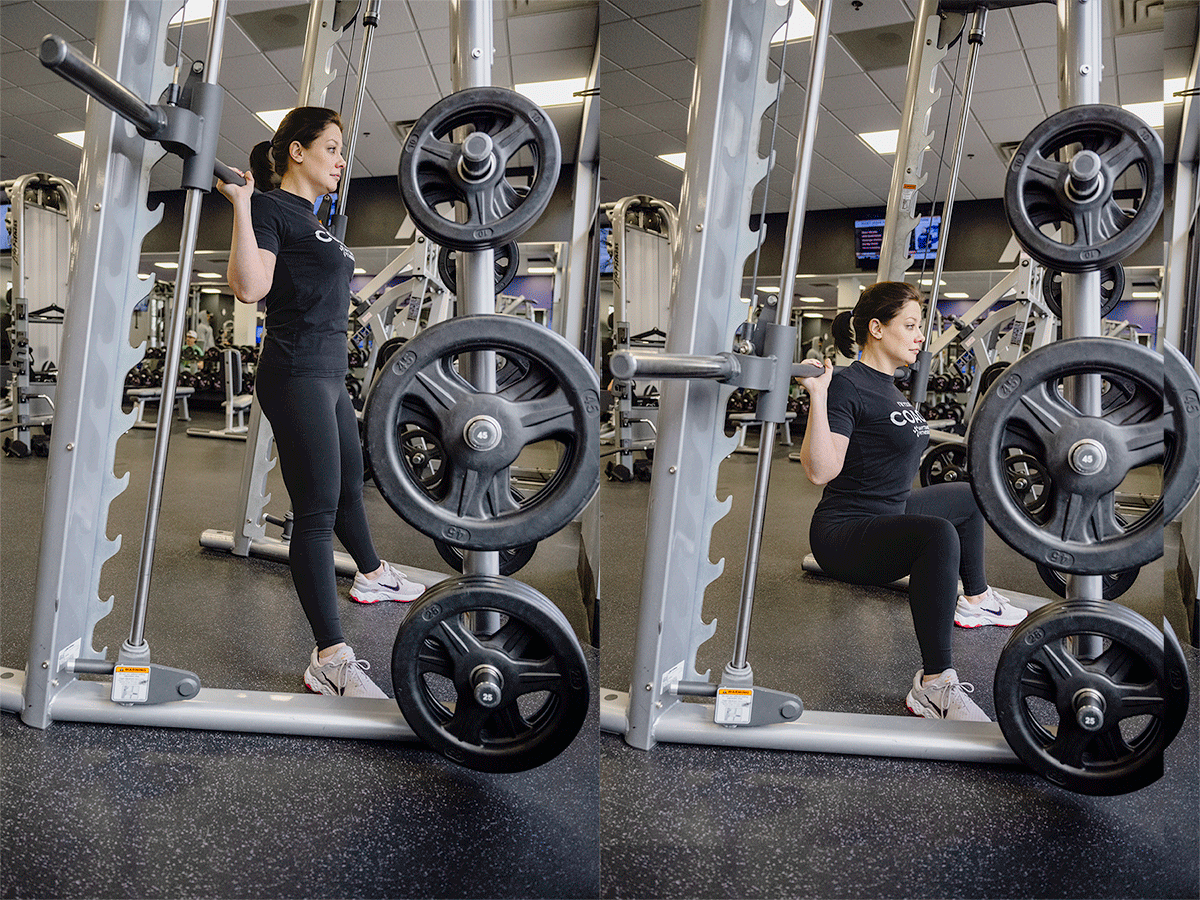
Set up:
- Adjust the barbell so that it’s slightly lower than the height of your shoulders, and secure it in place on the machine hooks. Make sure the safety bar is in place at or slightly above knee height.
- If desired, add weight plates to the bar.
- Face the direction that will allow the bar to travel down and toward your feet as you squat, and up and away as you stand.
How to:
- Position yourself underneath the bar and take a few steps forward so you are standing at a slight angle. You should be almost resting your upper back on the bar as you lean slightly back onto the bar.
- Step your feet apart wider than hip-width, and angle your toes outward into a sumo stance.
- Brace your core, bend your knees, and with control, drop your tailbone toward the floor as you lower into a squat.
- At the bottom of the squat position, aim for a 90-degree angle at the hips and knees.
- Exhale and press through the base of your foot as you squeeze your glutes to return to the starting position.
- Repeat.
2. Incline Bench Press Throws
Muscles worked: Pecs, triceps, and anterior deltoid
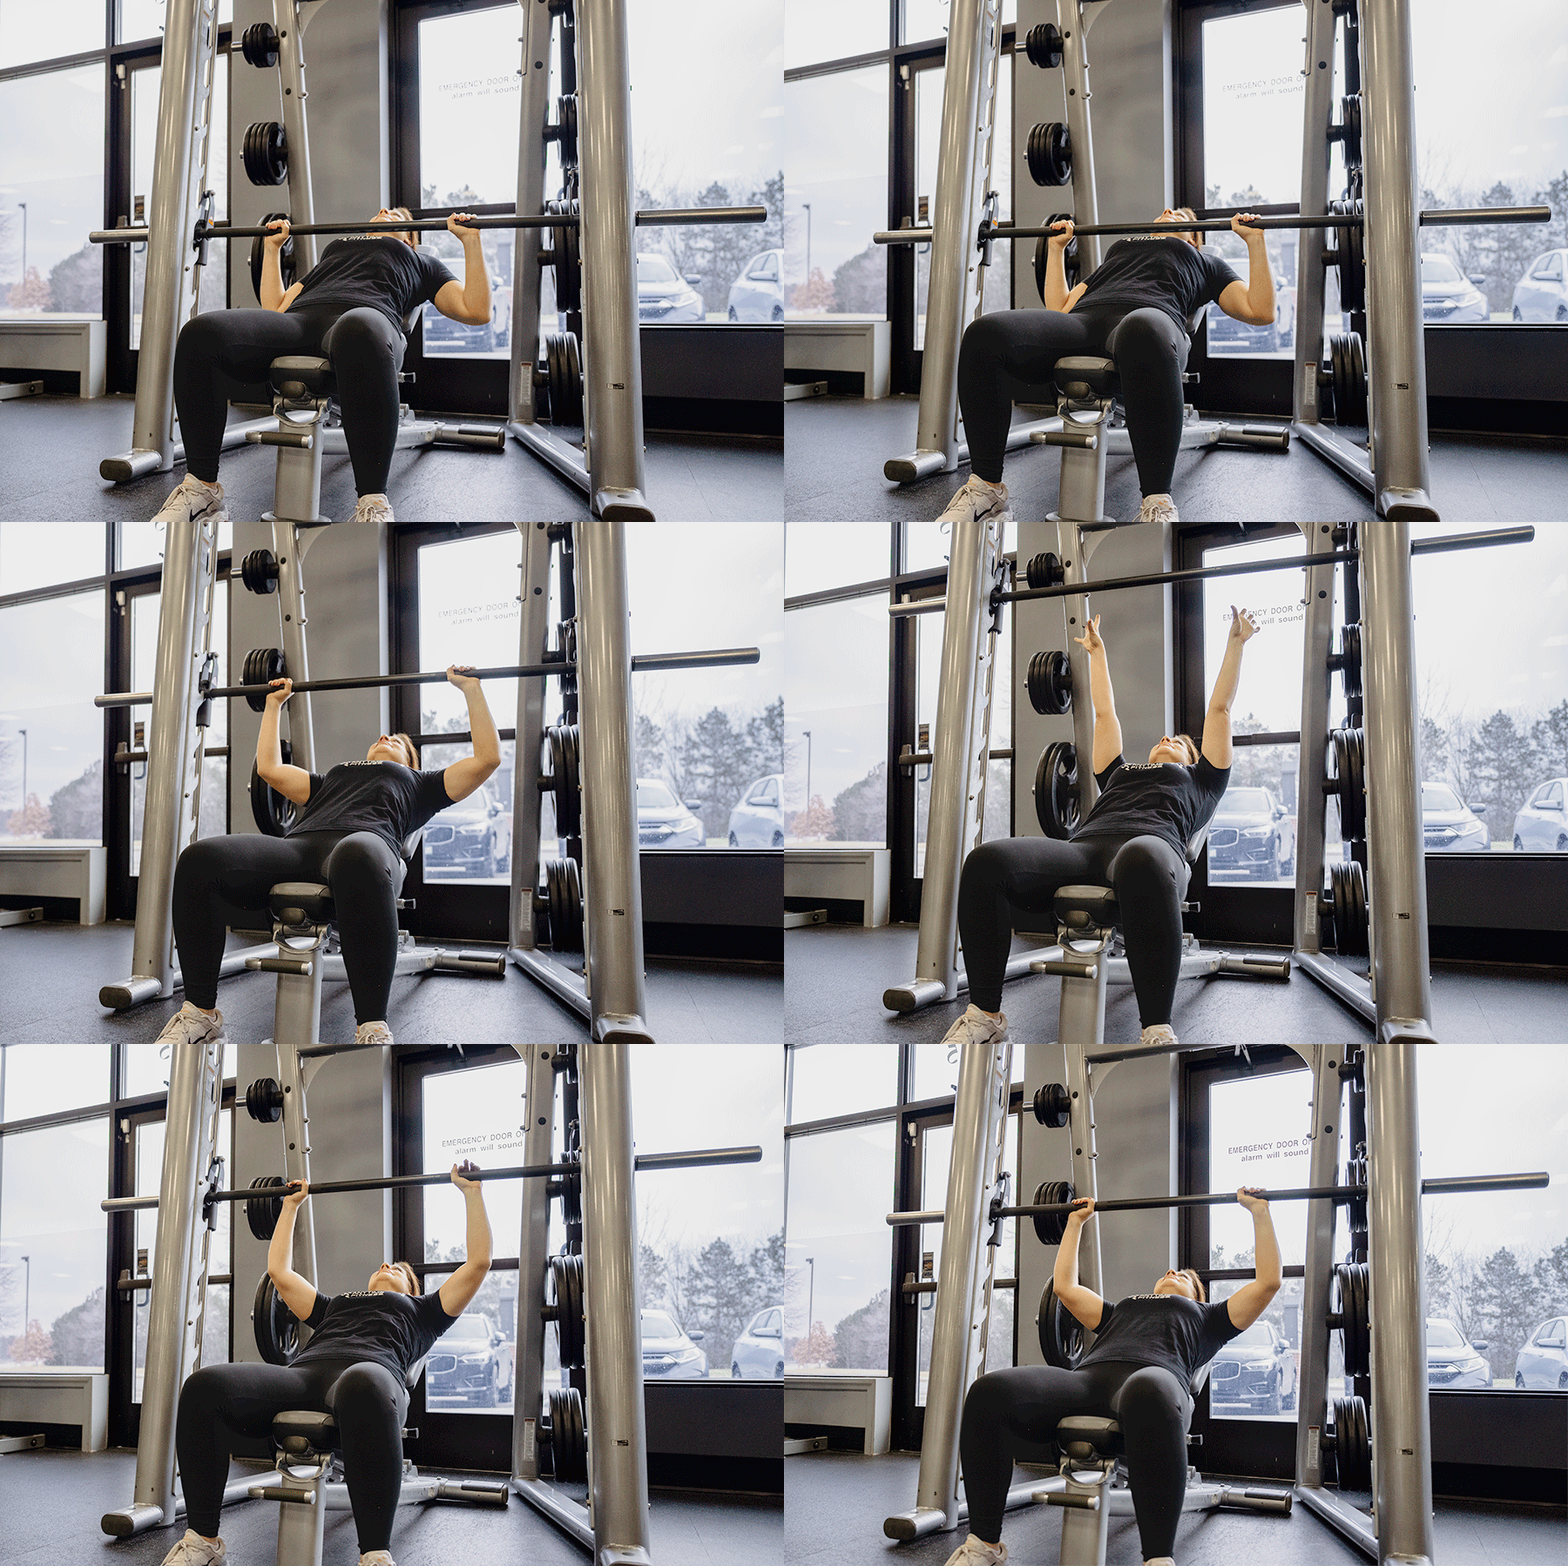
Set up:
- Adjust the barbell so that it’s about chest height, and secure it in place on the machine hooks.
- Make sure the safety bar is in place at or slightly above hip height. It should be above your chest as you lie on the bench.
- Position an angled bench underneath the bar. Adjust the bench position so that the bar is in your line of sight when you look up toward the ceiling.
- Before you begin: Perform a practice rep with no weight added, and further adjust the bench so that the bar comes down just above the center of your chest and the range of motion feels good for your arms.
- If desired, add weight plates to the bar.
How to:
- Lie on the bench and place your hands on the bar about shoulder-width apart.
- Lift the bar off the machine hooks and rotate the bar to fully unlock it so you’re able to move it freely.
- With control, lower the bar down toward your chest until your elbows are at about a 90-degree angle.
- Exhale as you explosively press the bar away from you and release your grip from the bar.
- Keep your arms up and hands open and ready to catch the bar as it comes down from the explosive press.
- As you catch the bar, use your chest and arm muscles to control the bar as it lowers down toward your chest.
- Repeat. (Because this exercise uses explosive power and your muscles may fatigue more quickly, aim for quality over quantity of reps.
3. Hip Thrusts
Muscles worked: Glutes, hamstrings, quadriceps, and adductors
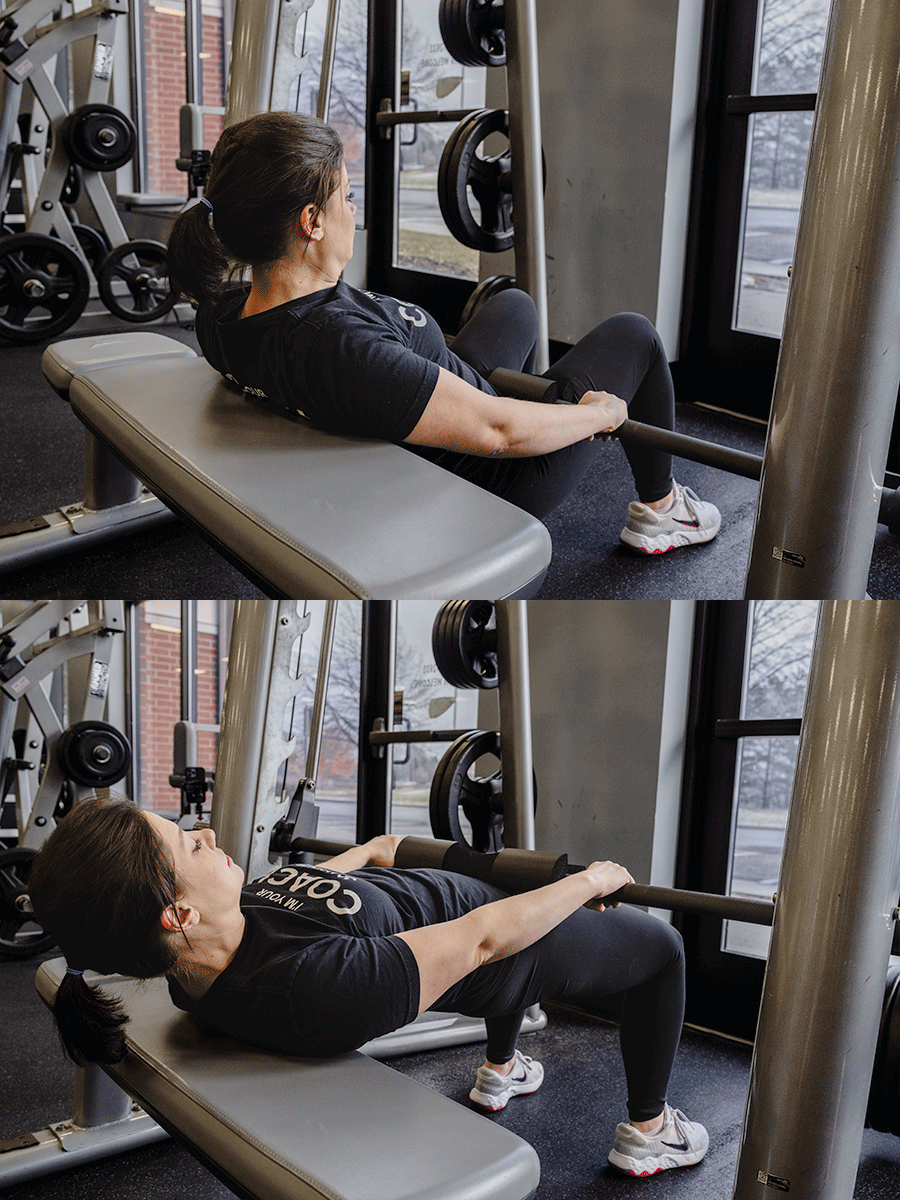
Set up:
- Adjust the barbell so that it’s at about knee height, and secure it in place on the machine hooks.
- Position a flat bench parallel to the bar but slightly in front of the machine. (You’ll need enough space to keep your arms straight out as you perform your reps, so adjust the position of the bench if needed.)
- Add weight plates if desired.
- The bar will be resting directly across your hips, which can cause irritation. Therefore, we recommend using a barbell pad for this exercise.
How to:
- Begin seated on the bench facing the machine. Lower yourself under the bar, rest your glutes on the floor, position your feet in front of you with knees slightly bent, and shoulder blades pressing back onto the bench behind you.
- Hold the bar with a wide grip and drive your hips up into a bridge position with feet flat on the floor, knees bent at 90 degrees. The bar should lie across your hips with your back securely on the bench.
- Brace your core and rotate the bar so that it releases from the machine hooks and can move freely.
- Lower your hips toward the floor while keeping a straight spine and a neutral head and neck position.
- At the bottom of the rep, flex your glutes and press into your heels as you drive your hips up toward the ceiling, bringing the bar back up to the starting position.
- Repeat.
4. Inverted Row
Muscles worked: Upper back muscles (latissimus dorsi, trapezius, rhomboids), pecs, and biceps
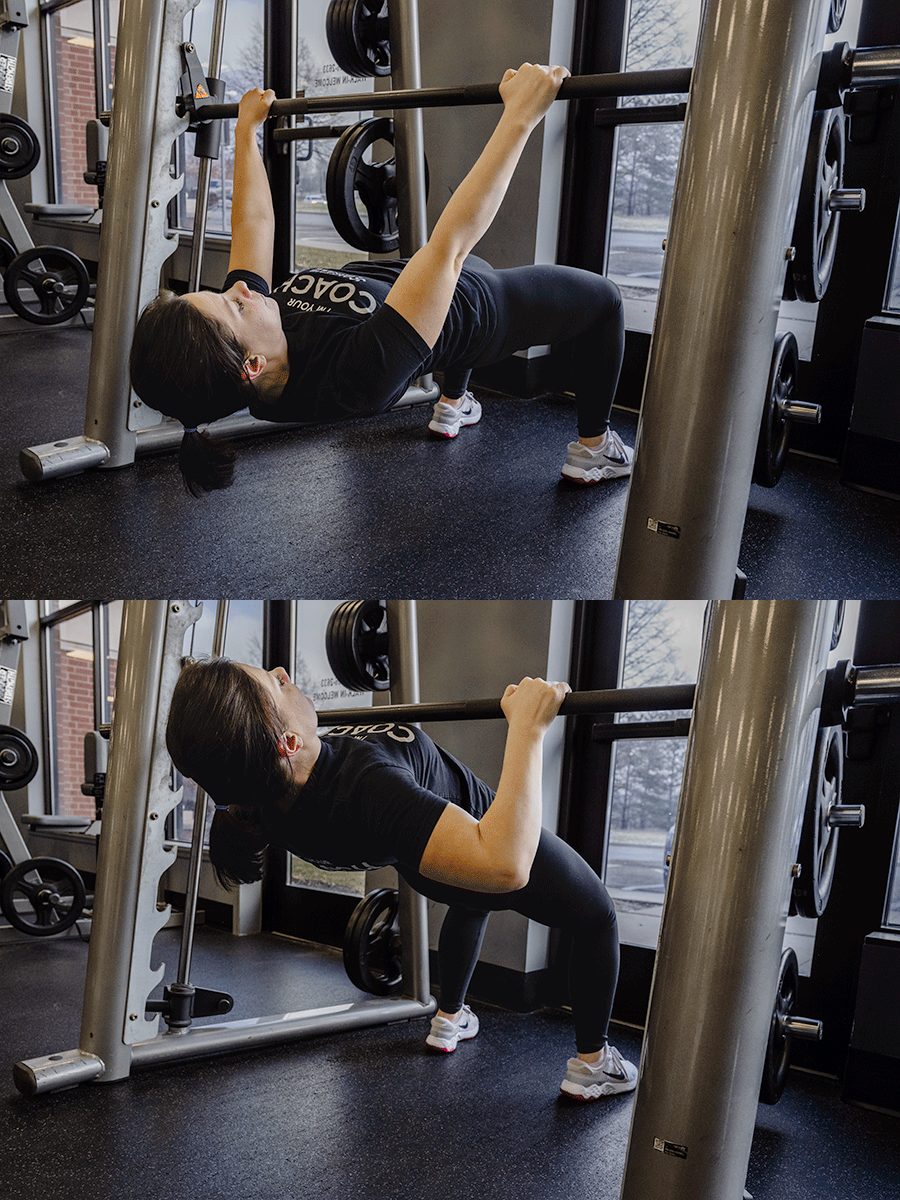
Set up:
- Adjust the barbell so that it’s around or slightly above knee height, and secure it in place on the machine hooks.
- If desired, place a mat underneath the bar.
- Face the machine for this exercise. To make the move more difficult, lower the bar down a notch. You can also try raising your feet on a box or increasing the time you hold at the top.
How to:
- Sit on the floor underneath the bar and place your hands on the bar about shoulder width apart.
- Grasp the bar, brace your core, and use your glutes to press your hips up and rise into a flat-back position with your body parallel to the floor and knees bent at 90 degrees.
- Exhale as you drive your elbows down and shoulder blades together to row your body up toward the bar.
- Develop even more strength by pausing for 1–2 seconds at the top of the rep.
- Inhale as you lower yourself back down into the starting position, slowly and under control.
- Repeat.
A final word training with the Smith machine
We all know it can be tough to navigate the gym and its equipment. With so many different machines and weights to choose from, it’s no wonder some can feel a certain level of intimidation. There’s good news, though, is that when you know how to use a Smith machine and other equipment like it correctly, the results can be rewarding AF.
Whether you’re looking to build muscle, improve your form, or just switch up your weight routine, talking with a personal trainer or coach should be a priority for anyone serious about their fitness goals. A new membership with Anytime Fitness includes a free session with a trainer, where you can ask about gym equipment, chat about your health and fitness goals, and create a 30-day fitness plan that’s personalized to YOU.
Find the Anytime Fitness location nearest you to sign up for your FREE 7-day pass. Seriously, we can’t wait to meet you.
